Imagine you just returned from a family vacation, your Android phone packed with countless photos—sunsets, laughter, and fun moments with loved ones. Now, imagine accidentally dropping your phone or realizing some pictures are gone. Heartbreaking, right? Those photos aren’t just files—they’re memories you want to keep forever.
The good news is that learning how to back up photos on Android is easier than it sounds. You don’t need to be a tech expert to make sure your photos are safe. In this guide, we’ll walk you through simple, step-by-step methods to back up photos on Android, so your memories stay protected no matter what happens to your phone.
Why You Should Back Up Photos on Android
Your Android phone is more than just a communication device—it’s a personal memory vault. Every selfie, group photo, or screenshot holds a memory you may want to revisit someday. Losing photos can happen in various ways:
- Accidental deletion of files
- Phone malfunction or crash
- Lost or stolen device
- System updates or factory resets
Backing up your photos ensures you always have a copy safely stored, either in the cloud or on another device. This way, whether you upgrade your phone, travel, or face technical issues, your precious memories remain secure.
Method 1: Using Google Photos to Back Up Photos on Android

Google Photos is the easiest and most popular tool to back up photos on Android. It’s free, automatic, and integrates seamlessly with your Google Account. Here’s how to set it up properly:
Step 1: Install and Open Google Photos
Most Android devices come with Google Photos pre-installed. If you don’t have it, download it from the Google Play Store. Open the app and sign in with your Google Account.
Step 2: Access Your Profile Settings
Tap on your profile picture in the top-right corner of the app. This opens your account settings.
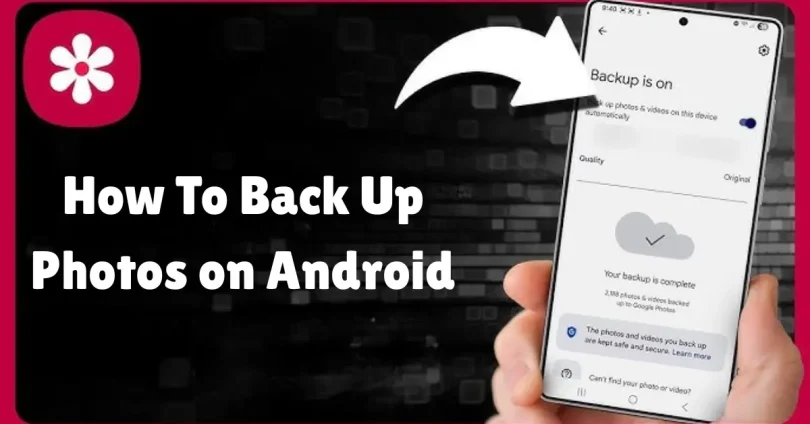
Step 3: Enable Backup & Sync
Navigate to Photos settings > Backup & Sync and turn it on. This allows your photos and videos to automatically upload to your Google Account whenever you’re connected to Wi-Fi or mobile data.
Step 4: Choose Backup Preferences
You can select:
- Upload size: High quality (free, slightly compressed) or Original quality (full resolution, counts against Google storage).
- Network options: Wi-Fi only or Wi-Fi and mobile data.
Step 5: Manual Backup
If you want to back up your photos immediately, tap Backup now. Google Photos will start uploading all images in your library right away.
Once set up, you can access your photos from any device by logging into photos.google.com. You can also organize them into albums, search by date or people, and even restore deleted images within 60 days.
You may also like to read this:
How To Clear Cache on iPhone | Speed Up Your Device Fast
How To Set Up A Smart Light | Easy Guide For Beginners
How To Use ChatGPT For Research And Make Studying Easier
How To Change Default Browser In Windows (10 & 11 Guide)
How To Fix A Slow Mac Quickly – Easy Tips That Work
Method 2: Back Up Photos Using a Cloud Storage App
While Google Photos is excellent, you might prefer other cloud storage apps like Dropbox, OneDrive, Amazon Photos, or Box. These services offer extra features, such as expanded storage and organized folders.
How to Back Up Photos Using Cloud Storage:
- Install the App: Download your chosen cloud storage app from the Play Store.
- Sign In: Use your existing account or create a new one.
- Enable Photo Backup: Most apps have a “Photos” or “Camera Upload” section. Turn it on.
- Select Network Preferences: Choose whether uploads occur over Wi-Fi only or include mobile data.
These cloud services automatically detect new photos and upload them in the background, just like Google Photos. They also let you share albums with friends and family easily.
Method 3: Back Up Photos to a Computer
If you prefer keeping your photos offline, backing them up to a computer is a reliable option. This method doesn’t require internet access and gives you full control over your files.
Step-by-Step Guide:
- Connect Your Android Device: Use a USB cable to connect your phone to your PC or Mac.
- Enable File Transfer: Unlock your phone and select File Transfer / Media Transfer Protocol (MTP) mode.
- Locate Your Photos: Open your phone storage on your computer and navigate to the DCIM folder. This folder stores most of your camera photos.
- Copy Photos: Select the images you want to back up and copy them to a folder on your computer.
This method is especially useful for large libraries of photos or when you want a secondary backup aside from the cloud.
Tips for a Smooth Backup Experience
- Check Storage Space: Ensure your Google Account or cloud service has enough space for all your photos. Free accounts may have limits.
- Enable Automatic Backup: This reduces the risk of losing new photos.
- Use Wi-Fi: Backing up over Wi-Fi is faster and avoids unnecessary mobile data usage.
- Organize Your Photos: Create albums or folders for birthdays, vacations, and special events for easier access later.
- Regularly Review Backups: Periodically check your backups to ensure all photos are uploaded correctly.
Extra Tips for Backing Up Photos on Android
While the methods we’ve already discussed cover most needs, there are additional strategies to make sure all your photos are fully protected.
1. Back Up WhatsApp and Social Media Photos
Many of your photos may not come from your camera but from apps like WhatsApp, Instagram, or Messenger. Here’s how to back them up:
- WhatsApp: Go to Settings > Chats > Chat Backup and enable backup to Google Drive. This ensures all photos and videos sent or received are saved.
- Instagram: Enable “Save Original Photos” in Instagram settings to ensure photos you post are stored on your device, which can then be backed up using Google Photos or cloud storage.
2. Use an External SD Card
If your Android device supports an SD card, it’s a simple way to create an offline backup:
- Insert an SD card into your phone.
- Open your Gallery or File Manager app.
- Move or copy photos from internal storage to the SD card.
This provides a physical backup that doesn’t rely on the internet, perfect for extra security.
3. Regularly Export Photos to a Computer
Even if you use cloud backups, it’s a good idea to periodically save a copy of your photos on a computer or external hard drive. Think of it as a “backup of your backup.”
4. Optimize Storage and Backup Settings
- High-Quality vs. Original Quality: Google Photos allows you to save photos in high-quality (slightly compressed) or original quality (full resolution). Choose based on your storage space and quality preference.
- Schedule Backups: Some apps allow you to set a schedule for automatic backups, so your phone does it while you sleep.
5. Consider Multiple Backup Methods
For maximum safety, combine two or more methods:
- Use Google Photos for cloud backup.
- Copy photos to an SD card or external hard drive.
- Keep important albums in Dropbox or OneDrive.
This way, even if one backup fails, you still have another copy.
Final Thoughts
Backing up your photos on Android doesn’t have to be complicated. Whether you use Google Photos, another cloud storage service, or a computer backup, the key is consistency. Automatic backups are ideal, but even occasional manual backups help safeguard your memories.
By making photo backups a habit, you can enjoy taking pictures freely, confident that your memories are safe, organized, and accessible anytime, anywhere.
Now that you know how to back up photos on Android, it’s time to secure those special moments before the next photo opportunity comes along.
FAQs: How To Back Up Photos on Android
Q1: How do I back up photos on Android for free?
You can back up photos for free using Google Photos. Simply install the app, sign in with your Google Account, and enable Backup & Sync. Photos will automatically upload whenever you’re connected to Wi-Fi or mobile data.
Q2: Can I back up photos without using Google Photos?
Yes! You can use other cloud storage services like Dropbox, OneDrive, Amazon Photos, or even manually copy your photos to a computer or external SD card.
Q3: Will backing up photos delete them from my phone?
No. Backing up photos creates a copy in the cloud or on another device. Your original photos remain on your phone unless you choose to delete them.
Q4: How can I back up WhatsApp photos on Android?
Open WhatsApp and go to Settings > Chats > Chat Backup. Enable backup to Google Drive. This will save all your chats, photos, and videos sent or received through WhatsApp.
Q5: Do I need an internet connection to back up photos?
Yes, for cloud backups like Google Photos, Dropbox, or OneDrive, you need an internet connection. For manual backups to a computer or SD card, no internet is required.